Unlock the potential of Microsoft 365 with the Microsoft Copilot course in Singapore. This comprehensive Microsoft Copilot course is designed to enhance your productivity using AI tools that integrate seamlessly across Microsoft applications. Whether you are a novice or looking to deepen your understanding, this course will equip you with the skills to utilize Copilot effectively.
Course Overview
The Microsoft Copilot course focuses on the capabilities of Microsoft 365 Copilot to streamline workflows. Participants will learn how to integrate AI tools into their daily tasks. Through hands-on experience, you will discover how Copilot can transform your productivity.
This course covers the functionality of tools like Excel and PowerPoint, showcasing how to automate repetitive tasks. By mastering these applications, you can leverage Microsoft 365 to achieve greater efficiency.
Course Objectives of Mastering Microsoft Copilot
The main objectives of the Copilot course are to provide a solid understanding of Microsoft Copilot’s features and to teach participants how to apply these features in real-world scenarios. You will learn to create prompts that enhance your productivity with generative AI. Additionally, the course aims to familiarize you with the AI-driven capabilities of Microsoft 365.
Participants will also explore the benefits of using Copilot in Office 365 and how it complements Microsoft Copilot. By the end of the course, you will be able to confidently navigate Microsoft 365 applications with AI support, and integrate Copilot in your work.
Course Schedule for Microsoft Copilot Courses
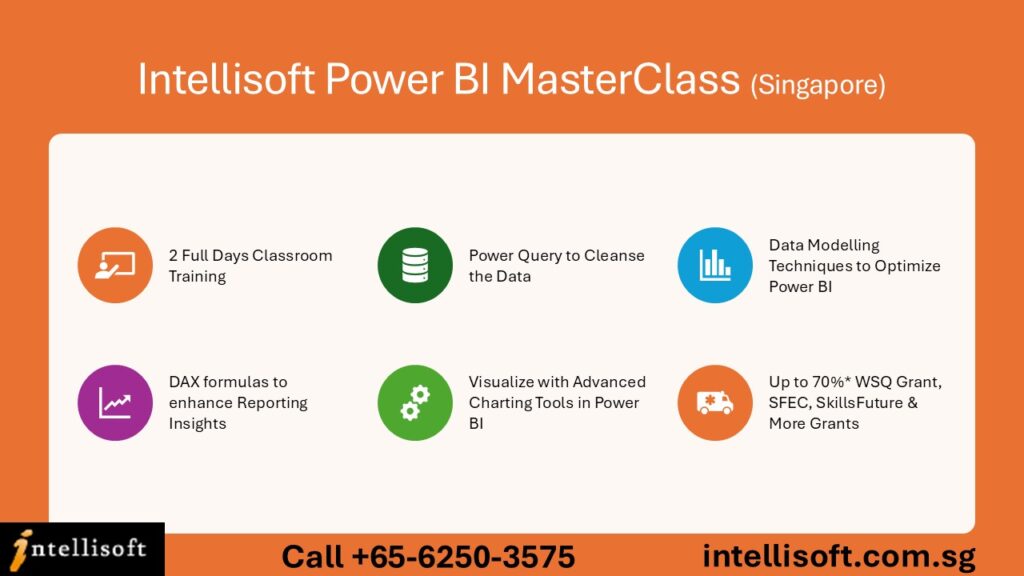
The Microsoft 365 Word Excel PowerPoint with Copilot course duration spans 3 days, with sessions designed to cover the three key Office Tools. A shorter version of this course, from half a day to a full day or more can be customized for your organization too. Use Copilot to enhance your productivity at work.
This customized course option allows participants to learn based on their time available, while still benefiting from live sessions. Each module focuses on different aspects of Microsoft 365 Copilot, ensuring comprehensive coverage of all essential topics.
Whether you are participating in a shorter course, or a comprehensive course for mastering Microsoft Copilot, the course is structured to maximize learning. You will engage in practical exercises that reinforce your understanding of workflow automation.
If you wish to learn MS-4007 Course – Empower Your Workforce with Copilot for Microsoft 365 Use Cases, we offer this as a 1 day workshop – onsite and at our office too.
Prerequisites for Joining Microsoft Copilot 365 Courses
No prior experience with Microsoft 365 is necessary for this course; however, familiarity with basic computer skills will be beneficial. The course is designed to accommodate both beginners and advanced users looking to enhance your productivity through AI. A willingness to explore new technologies will significantly enrich your learning experience.
For those who aim to deepen their skills, additional resources for Microsoft co pilot will be provided. This includes access to Microsoft Learn and other e-learning platforms that complement the course material.
Intellisoft offers Digital Transformation with AI Tools courses
Join Intellisoft Systems 2 Day WSQ Funded course on Digital Transformation with AI Tools like ChatGPT, Gemini, Claude, FireFlies.ai, Canva, Audio AI Tools, Video AI Tools, Productivity AI Tools in Singapore.
A separate Canva course with SkillsFuture and WSQ funding from SSG Singapore is available for Singaporeans and Permanent Residents with grants.
We also have a WSQ Approved Create Agentic AI Automations Without Coding course to create your own AI Automations. You can also explore Copilot Pro in and the power of Copilot Studio to create your own AI agents with Microsoft Tools.
Unlock the Power of Microsoft Copilot with Intellisoft Training
✅ Transform the Way You Work with AI
At Intellisoft, we bring you a series of hands-on, instructor-led Microsoft Copilot courses designed to help you harness the full power of AI across Microsoft 365 apps. Whether you’re a business user, a team leader, or part of an operations or HR team, these courses will show you how to work faster, think smarter, and get more done — all with the help of Copilot.
Our Copilot training suite includes:
-
MS-4007: Microsoft 365 Copilot User Enablement Specialist
-
Working Smarter with Copilot in Word, Excel & PowerPoint
Each course is designed using official Microsoft Learn materials and led by expert instructors to ensure practical, real-world learning that you can apply immediately in your workplace.
What is Microsoft Copilot?
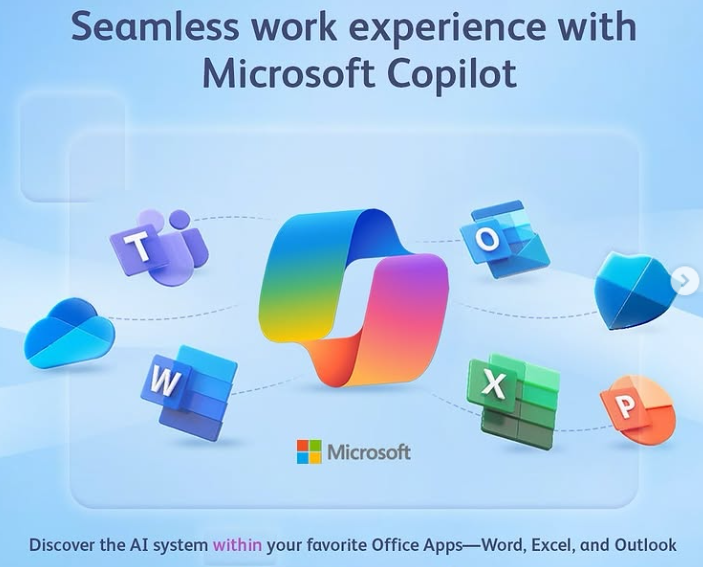
Microsoft Copilot is your AI-powered assistant built right into Microsoft 365 apps like Word, Excel, PowerPoint, Outlook, and Teams. It uses large language models (LLMs), Microsoft Graph, and your content to help you draft, summarize, analyze, and automate tasks — all with natural language prompts.
Imagine:
-
Writing a full proposal or policy in Word with just a short prompt
-
Creating charts, insights, and forecasts in Excel without writing formulas
-
Generating entire presentations in PowerPoint from your meeting notes or a report
With Copilot, you’re not just working faster — you’re working smarter.
Courses We Offer
MS-4007: Microsoft 365 Copilot User Enablement Specialist
Learn to champion the adoption of Copilot in your organization. This course is ideal for team leads, change agents, and digital champions tasked with driving AI transformation at work. You’ll learn how to implement Microsoft’s user enablement framework, identify high-value Copilot scenarios, and support colleagues in their AI adoption journey.
Work Smarter with Copilot in Word, Excel & PowerPoint
This 1-day course gives you practical experience using Copilot directly in the three core apps:
-
Word: Draft content, rewrite text, create reports, and summarize meetings
-
Excel: Generate formulas, analyze trends, build dashboards and insights
-
PowerPoint: Instantly turn outlines into full slides, refine layouts, and add visual appeal
Perfect for professionals who use Office daily and want to supercharge their productivity with AI.
Free Trial of Microsoft Copilot for AI-Driven Productivity
A free trial of Microsoft Copilot is available to participants who want to try this new AI software in their own lives and workplace for content creation or improving efficiency and productivity. This 30 day free trial can be cancelled at any time, but does require a credit card to be keyed in initially.
Mode of Assessment
Assessment will take place through hands-on projects that allow you to demonstrate your understanding of the course content. You will work on real-world scenarios that require you to apply what you’ve learned about Copilot. Feedback will be provided to help you improve and refine your skills.
By the end of the course, participants will receive a certificate acknowledging their completion. This certification serves as a valuable addition to your professional portfolio, showcasing your proficiency in using Microsoft 365 Co-pilot.
Fees and Funding
The Copilot course is competitively priced to make it accessible to a wide audience. Various funding options are available to support learners in Singapore. You can inquire about potential subsidies and grants that may help cover course fees. Participants can also use their SkillsFuture Credits for the 3 day Microsoft Office with Copilot, and the Digital Transformation with AI Tools courses.
Investing in your skills through this course will open up new opportunities in your career. The knowledge acquired will not only enhance your productivity but also position you as a leader in digital transformation.
FAQ
What are the prerequisites for the Copilot course?
No prior experience is needed, but basic computer skills are recommended. This is a very practical and hands-on course, one of our best Microsoft copilot courses.
What is the course duration?
The course can be customized for your organization, based on the available time. Usually we do a 1 day course, and we also offer a WSQ funded Microsoft Word Excel PowerPoint with Copilot course which is for 3 full days.
Will I receive a certificate after completing the course?
Yes, a certificate will be awarded upon successful completion of the Microsoft Office course with 365 and Copilot. For corporate trainings on Copilot courses, we will provide a certificate of attendance also.
What is the mode of assessment for Mastering Microsoft Copilot?
Assessment includes hands-on projects based on real-world scenarios. If you opt for a customized corporate training on Copilot Courses in Singapore without any WSQ Funding, then there is no requirement for any assessment, and we can completely skip it, to focus the entire time on Mastering Microsoft Copilot.
Are there funding options available?
Yes, there are various funding options to support learners. The WSQ Funding comes from SSG Singapore for the 3 day comprehensive course on Microsoft 365 with Copilot. It covers Copilot across Microsoft 365.
Do I need prior AI or technical knowledge to attend these courses?
No. These courses are designed for everyday Microsoft 365 users. If you’re comfortable using Word, Excel, or PowerPoint, you’re ready for Copilot training.
Is Copilot already included in Microsoft 365?
No. Copilot is a premium add-on to Microsoft 365 and must be purchased by your organization. You will need a Copilot-enabled account to practice during the course.
Will I get hands-on experience with Copilot?
Yes! All our sessions are interactive, with guided labs, exercises, and real-world examples using your Copilot-enabled Microsoft 365 apps.
What’s the difference between MS-4007 and the Word/Excel/PowerPoint with Co Pilot course?
The Microsoft MS-4007 focuses on enabling teams to adopt Copilot across organizations. The Word/Excel/PowerPoint course is more about hands-on productivity techniques for individual users.
CONTACT INTELLISOFT for COPILOT COURSES IN SINGAPORE
Call us at +65-6252-5033 or email to training@intellisoft.com.sg with your training requirements. Alternatively, you can fill our Enquiry Form, and tell us what exactly do you need. We will get back to you within 1 business day.
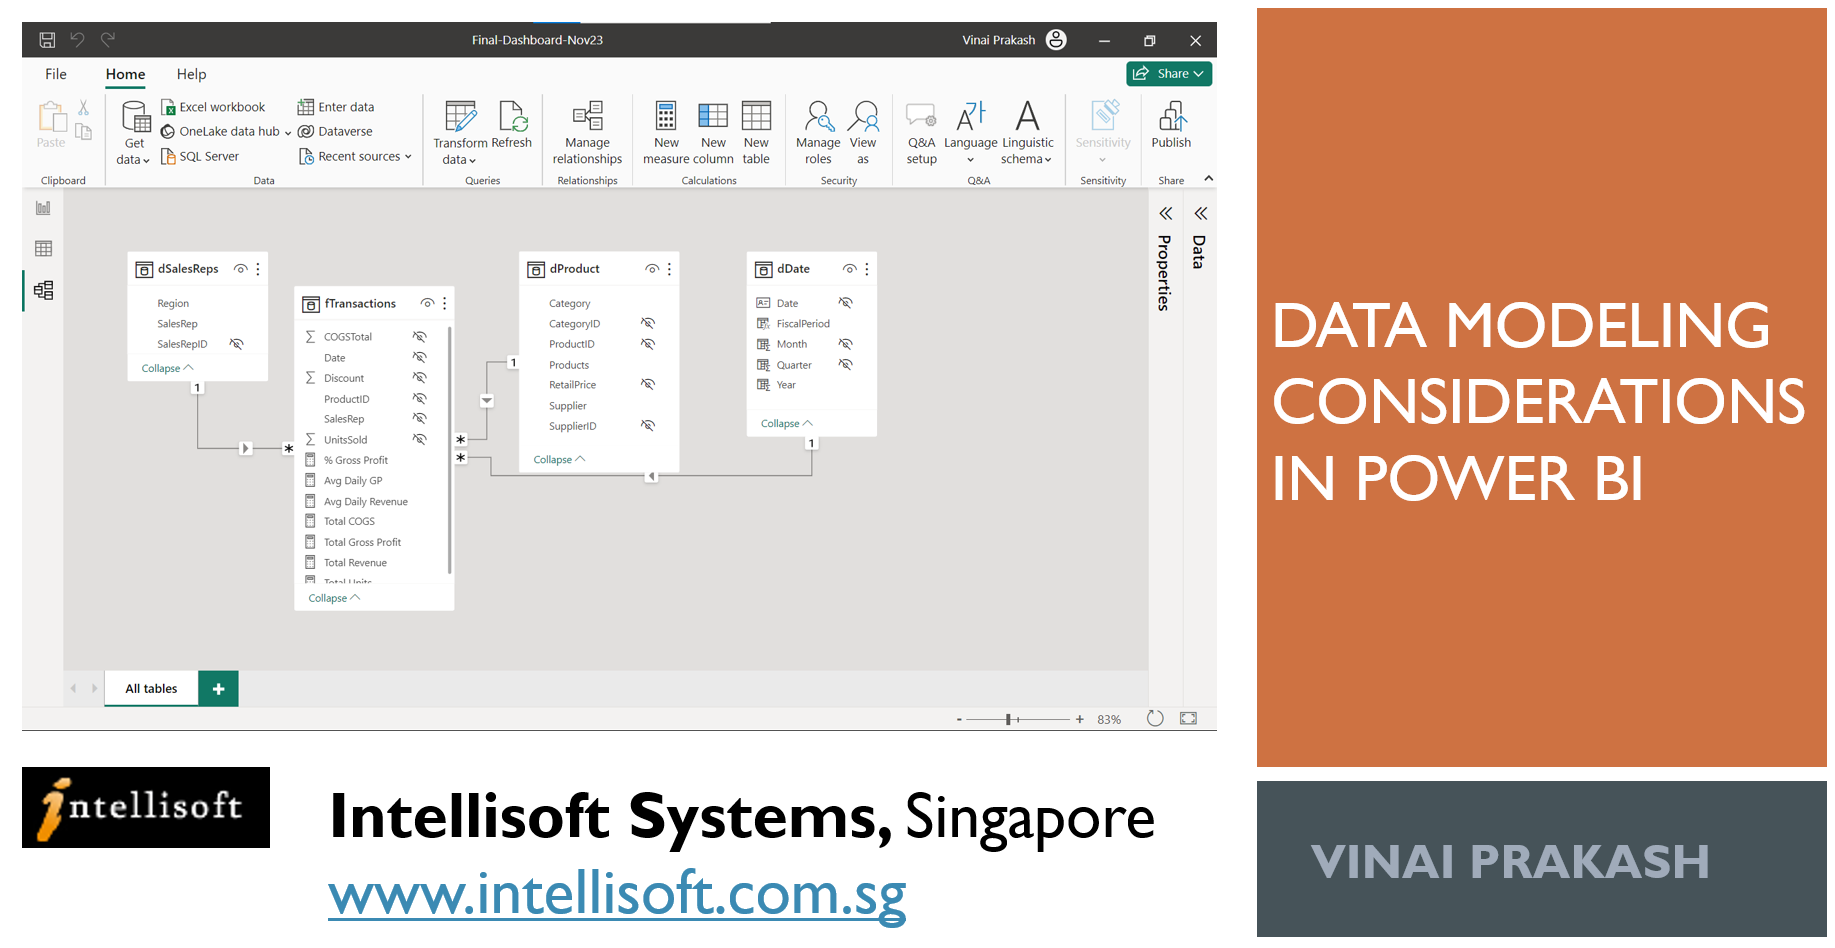
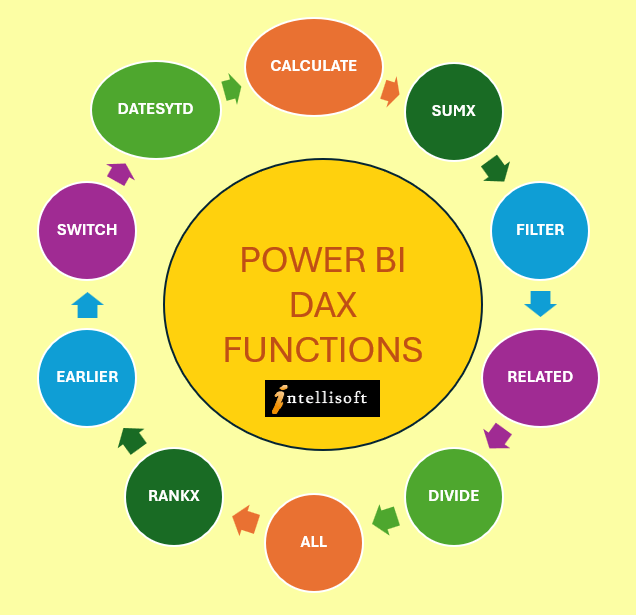
 Finally, structure your data to ensure it is ready for analysis.